
Spilling nail polish on a tile floor can feel like watching a slow-motion disaster unfold. One second you’re painting your nails peacefully, and the next, bright red polish is spreading across your bathroom or kitchen tiles like a tiny paint explosion. The good news? Most tile floors can survive a nail polish spill without permanent damage if you clean it correctly and quickly.
Fresh nail polish is much easier to remove than dried polish because the solvents inside the polish have not fully evaporated yet. Once the polish hardens, it behaves more like plastic glued onto the floor. According to recent cleaning guides, glazed ceramic and porcelain tiles are among the easiest surfaces to clean because they are non-porous, while grout and natural stone require extra caution due to their absorbent surfaces.
Before grabbing acetone and scrubbing aggressively, it’s important to identify your tile type, choose the right cleaning method, and avoid common mistakes that can leave scratches, dull spots, or stained grout behind. This guide walks you through everything step by step so you can remove nail polish safely and efficiently without damaging your floor.
Why Nail Polish Sticks to Tile Floors
Nail polish may look harmless sitting inside a tiny bottle, but chemically, it is designed to become extremely durable once exposed to air. Most nail polish formulas contain pigments, solvents, and nitrocellulose resin. As the solvents evaporate, the resin hardens into a plastic-like film that grips surfaces tightly. That’s why nail polish can survive showers, dishwashing, and everyday wear on fingernails. Unfortunately, it behaves the same way on tile floors.
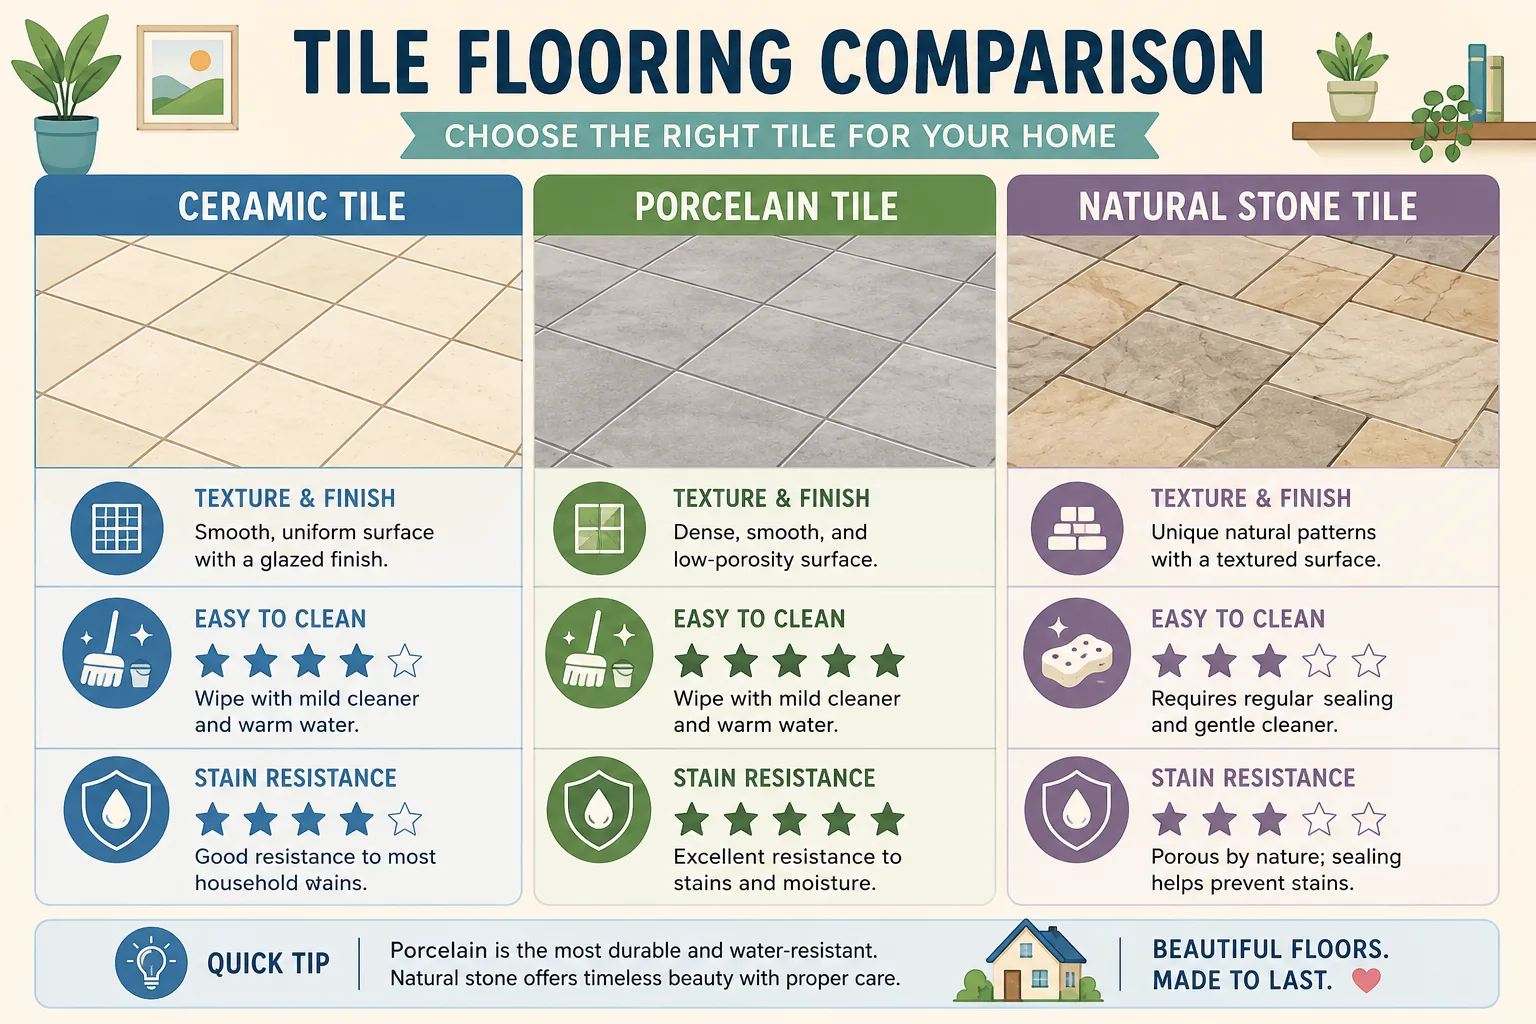
The type of tile you have plays a massive role in how difficult cleanup becomes. Glazed ceramic and porcelain tiles are less porous, meaning the polish usually sits on top of the surface rather than soaking in deeply. Natural stone tiles like marble, travertine, or slate are more absorbent and vulnerable to staining because tiny pores trap pigments and solvents inside the surface. Recent flooring experts note that grout is especially vulnerable because it absorbs polish quickly and may discolor permanently if left untreated too long.
Texture also matters. Glossy tiles are generally easier to clean because the smooth finish prevents nail polish from locking into grooves. Matte or textured tiles create friction points where dried polish can cling stubbornly. Think of glossy tiles like a glass tabletop and textured tiles like sandpaper. One lets the spill slide around; the other grabs onto it.
Timing changes everything too. A fresh spill is usually removable with mild soap or rubbing alcohol. Dried polish becomes much harder because the resin fully cures and bonds to the surface. This is why professionals always recommend acting immediately instead of waiting until later. Even ten extra minutes can make the difference between a quick wipe-up and an hour-long scrubbing session.
Identifying Tile Material and Finish
Before using any cleaner, you need to identify what kind of tile floor you’re dealing with. Using the wrong solvent on the wrong surface is one of the fastest ways to turn a simple spill into permanent damage. Some tiles tolerate acetone well, while others can become dull, etched, or discolored after just one application.
Ceramic Tile
Ceramic tile is one of the most common household flooring materials. Most ceramic tiles have a protective glaze that resists staining and moisture. That glaze acts like armor against nail polish, which means spills are usually removable with gentle solvents like rubbing alcohol or small amounts of acetone. According to recent flooring cleaning recommendations, glazed ceramic tile is generally safe for acetone-based removers when used carefully and rinsed afterward.
The easiest way to recognize ceramic tile is by its slightly softer texture and lighter weight compared to porcelain. Ceramic tiles also tend to chip more easily around the edges. If your tile has a shiny coating, you likely have glazed ceramic, which is much safer to clean than unglazed varieties.
Porcelain Tile
Porcelain tile is denser and less porous than ceramic tile. Because of its durability, it usually handles nail polish cleanup very well. Cleaning experts recently explained that nail polish bonds only at the surface level on porcelain, making removal easier than many homeowners fear.
Porcelain often has a polished or matte factory finish. Matte porcelain deserves more caution because aggressive scrubbing or strong solvents may affect printed patterns or faux wood textures. Many homeowners online recommend testing acetone in an inconspicuous area first, especially on decorative finishes.
Natural Stone Tile
Natural stone is where things become tricky. Marble, granite, travertine, and slate react differently to solvents because they are porous and chemically sensitive. Acetone, vinegar, and acidic cleaners may etch the stone or strip away sealants. Flooring specialists strongly advise using only pH-neutral cleaners or stone-safe solvents on natural stone surfaces.
If you are unsure whether your tile is natural stone, look for uneven color patterns and textured imperfections. Natural stone rarely looks perfectly uniform because it comes directly from quarried material.
Matte vs Glossy Finishes
Glossy tiles are generally easier to clean because the smooth coating prevents nail polish from bonding deeply. Matte tiles, however, contain microscopic texture that traps pigments more aggressively. This means you may need longer soaking times and softer cleaning tools to avoid damaging the finish.
A glossy finish behaves like a raincoat, allowing spills to sit on the surface. Matte finishes act more like fabric, grabbing onto stains and making removal more difficult. Understanding this difference helps you choose safer cleaning methods from the beginning.
Essential Supplies Before Cleaning
A successful cleanup starts with using the right supplies. Many people damage tile floors not because of the solvent itself, but because they use aggressive tools like steel wool, razor blades, or hard scrubbers. The goal is to dissolve and lift the polish gently instead of scraping the floor like you’re sanding wood.
Here are the safest tools to gather before you begin:
| Cleaning Tool | Purpose | Safe for Most Tiles |
|---|---|---|
| Microfiber Cloth | Wiping and blotting | Yes |
| Cotton Balls | Applying solvents | Yes |
| Plastic Scraper | Lifting dried polish | Yes |
| Soft Toothbrush | Cleaning grout | Yes |
| Dish Soap | Final cleaning rinse | Yes |
| Warm Water | Diluting residue | Yes |
Plastic scrapers are especially important because metal tools can permanently scratch tile finishes. Multiple flooring experts warn against using utility knives or metal blades on glazed tile surfaces.
When choosing solvents, it’s best to start with the mildest option first. Think of cleaning like climbing a ladder. You begin gently and only move to stronger methods if necessary. The safest progression usually looks like this:
- Warm water and dish soap
- Isopropyl alcohol
- Baking soda paste
- Hydrogen peroxide
- Acetone
This gradual approach minimizes the risk of damaging grout, sealants, or decorative finishes.
Safe Solvents and Cleaning Techniques
Choosing the correct solvent can make the difference between effortless cleanup and permanent floor damage. Not every stain requires acetone, and sometimes the gentler option works surprisingly well.
Isopropyl Alcohol
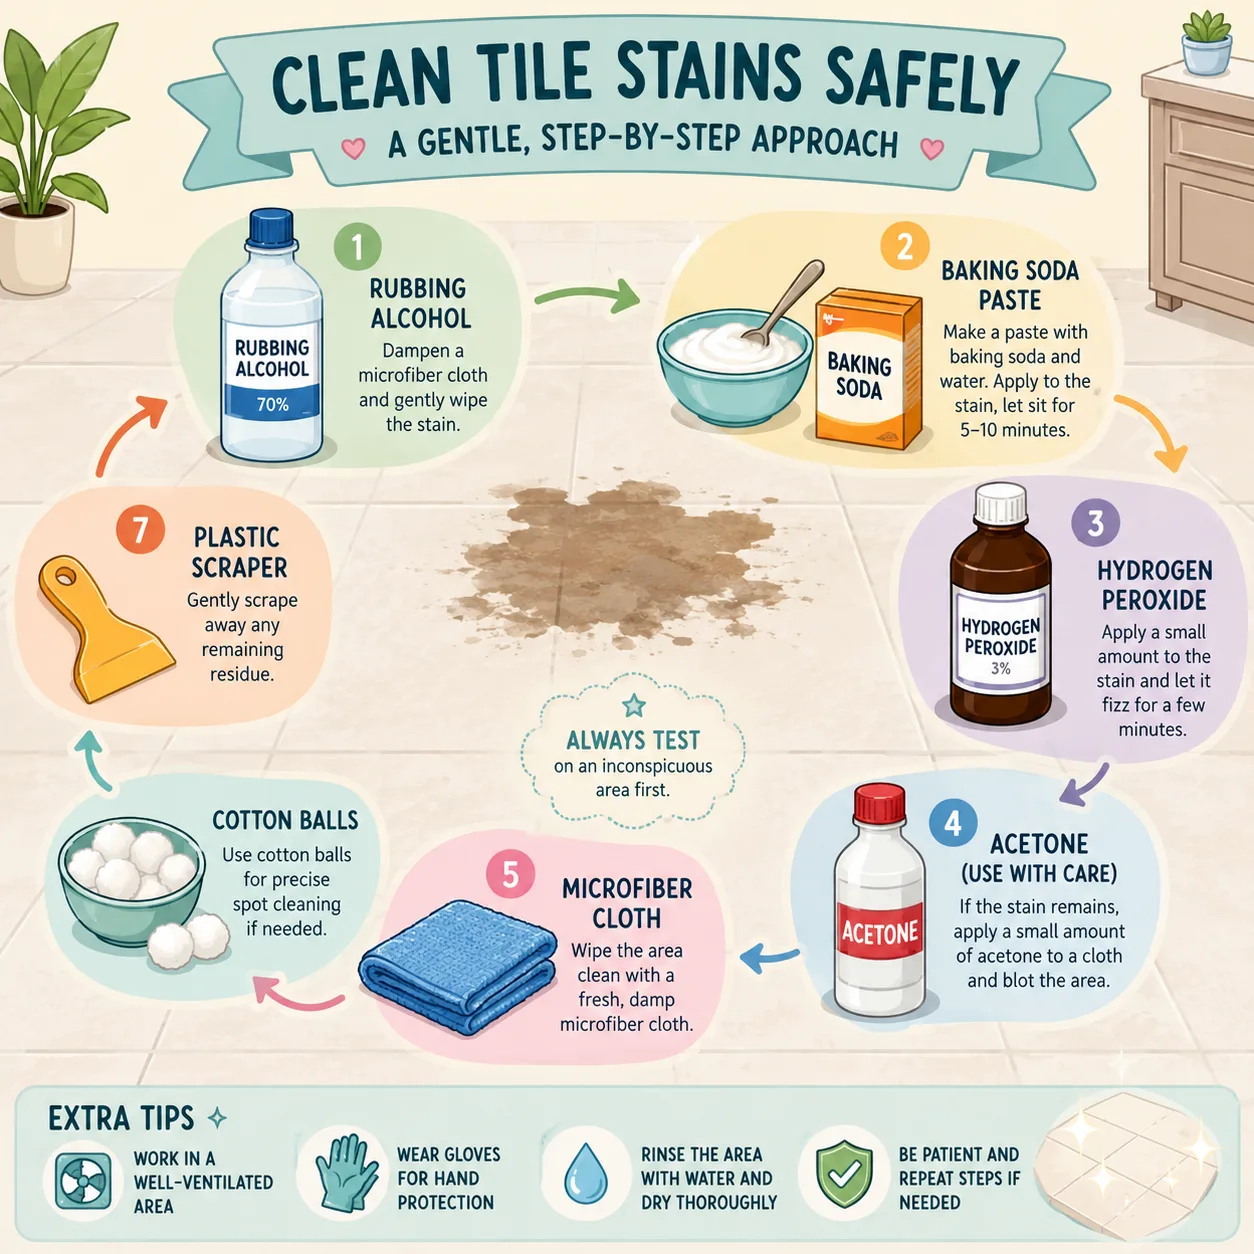
Isopropyl alcohol, commonly known as rubbing alcohol, is often the safest first-line cleaner for tile floors. It dissolves many nail polish formulas without the harshness of acetone. Cleaning experts recently described rubbing alcohol as effective for loosening the hardened resin inside nail polish while remaining safe for most tile surfaces.
To use it properly, dampen a cotton ball or microfiber cloth and press it onto the stain for several minutes. This softens the polish before wiping. Avoid aggressive rubbing at first because spreading the stain can make cleanup harder.
Alcohol works particularly well for:
- Fresh spills
- Light-colored polish
- Glossy ceramic tile
- Porcelain tile
- Small grout stains
Acetone
Acetone is the strongest and fastest household solvent for nail polish removal. It breaks down hardened polish rapidly, making it ideal for stubborn or dried stains. However, acetone is also aggressive enough to damage delicate finishes, sealants, or synthetic coatings if used carelessly.
Recent flooring guides recommend acetone mainly for glazed ceramic and porcelain surfaces, while avoiding it on natural stone and decorative finishes.
If using acetone:
- Test a hidden spot first
- Use only small amounts
- Never pour directly onto grout
- Ventilate the room
- Rinse immediately after cleaning
Acetone is like using a pressure washer instead of a garden hose. It works quickly, but too much force can create another problem.
Hydrogen Peroxide
Hydrogen peroxide is useful for stubborn stains, especially on grout. It has mild bleaching properties that help lift pigments from porous surfaces. Experts recommend letting 3% hydrogen peroxide sit on the stain for 5–10 minutes before gentle scrubbing.
Because peroxide can slightly lighten grout, always test it first in a hidden area.
Baking Soda Paste
Baking soda mixed with water forms a gentle abrasive paste that helps loosen polish without scratching surfaces. This method works especially well for textured tile and grout. Unlike harsh scrubbers, baking soda provides controlled friction while remaining relatively safe for most finishes.
Many homeowners prefer baking soda because it is inexpensive, non-toxic, and easy to rinse away. It may not work as quickly as acetone, but it dramatically reduces the risk of accidental damage.
Step-by-Step Removal Process
Cleaning nail polish from tile floors becomes much easier when you follow a structured process instead of improvising. Jumping randomly between chemicals usually spreads the stain or damages the finish.
Removing Wet Nail Polish
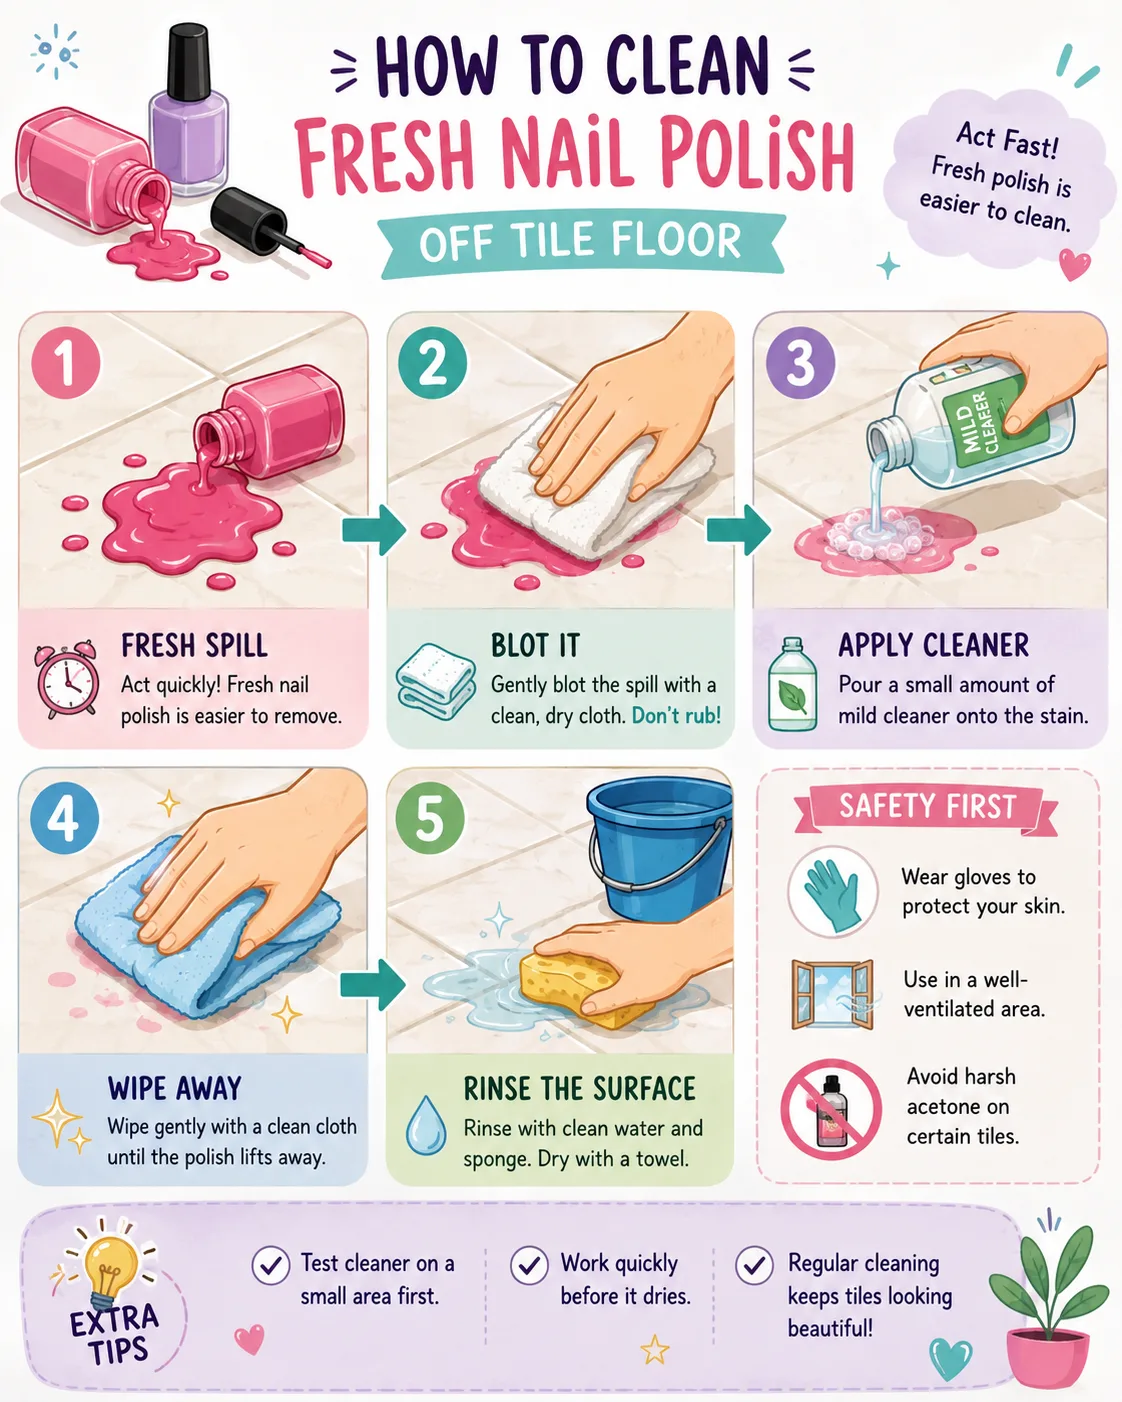
Fresh spills are the easiest to handle. Start by blotting the spill gently with paper towels or a microfiber cloth. Do not rub immediately because rubbing spreads the polish into grout lines and textured areas.
Once most of the liquid is absorbed:
- Mix warm water with mild dish soap
- Wipe the area gently
- Apply rubbing alcohol if color remains
- Use a microfiber cloth to lift residue
- Rinse thoroughly with clean water
Some cleaning experts even recommend sprinkling sugar or salt over fresh spills to help absorb excess polish before wiping.
Removing Dried Nail Polish
Dried polish requires patience. Start by softening the hardened layer using rubbing alcohol or acetone applied to a cloth. Let it sit for several minutes so the solvent penetrates the polish.
Next:
- Use a plastic scraper at a low angle
- Lift softened polish slowly
- Reapply solvent if needed
- Avoid forcing stubborn sections
- Clean remaining residue with soap and water
Recent cleaning guides emphasize using plastic instead of metal scraping tools to prevent scratches.
The key here is repetition rather than brute force. Several short treatments are safer than one aggressive attack.
Cleaning Nail Polish from Grout
Grout behaves like a sponge, which makes it the hardest part of cleanup. Once pigment sinks into grout pores, removal becomes more challenging.
For grout cleaning:
- Apply rubbing alcohol carefully
- Let it soak for 5–10 minutes
- Scrub gently with a toothbrush
- Rinse thoroughly
- Repeat if necessary
Hydrogen peroxide or baking soda paste may help stubborn stains. Some homeowners also reseal grout after using acetone because strong solvents can weaken protective sealers.
Final Surface Cleaning
After the stain disappears, always wash the floor thoroughly with mild soap and warm water. This removes leftover solvent residue that could dull the finish over time.
Dry the surface with a microfiber towel afterward. Standing moisture can attract dirt or create cloudy streaks on glossy tile.
Avoiding Damage or Stains During Cleaning
The biggest mistake homeowners make is panicking. Panic cleaning usually means grabbing the strongest chemical available and scrubbing aggressively. Unfortunately, tile damage often happens faster than stain removal.
One common mistake is using steel wool or abrasive pads. These tools scratch glossy finishes permanently, leaving dull marks even after the polish disappears. Another mistake is scraping with knives or razor blades at steep angles. Flooring experts repeatedly warn that metal tools can gouge ceramic and porcelain finishes permanently.
Overusing acetone creates problems too. Acetone evaporates quickly, but while it’s active, it can soften sealants, discolor decorative coatings, and weaken grout protection. Decorative faux wood porcelain tiles are especially vulnerable because printed surface designs may react unpredictably to strong solvents.
Ventilation matters as well. Strong solvent fumes build up rapidly in small bathrooms. Open windows or run ventilation fans whenever using acetone or alcohol-based cleaners.
Another overlooked issue is mixing chemicals. Some homeowners combine acetone, peroxide, alcohol, or household cleaners hoping for a stronger effect. This is dangerous and unnecessary. Chemical mixtures can create toxic fumes or unpredictable reactions. Even online cleaning communities strongly caution against mixing solvents together.
The safest strategy is simple: identify the surface, start gently, and increase cleaning strength only if necessary.
Tips for Quick and Efficient Cleanup
Fast action is your biggest advantage during a nail polish spill. The longer the polish sits, the harder it bonds to the floor. Think of fresh nail polish like wet cement. You want to stop it before it hardens.
Emergency Spill Response
If a bottle shatters:
- Stay calm
- Prevent spreading
- Blot instead of wiping
- Protect grout immediately
- Start with mild cleaners first
Many people instinctively wipe across the spill, but this spreads pigment into grout lines and textured areas. Blotting keeps the stain contained.
Having a “spill kit” nearby also helps. Keeping cotton balls, rubbing alcohol, microfiber cloths, and a plastic scraper in the bathroom can dramatically reduce cleanup time.
Preventing Future Nail Polish Accidents
Sometimes prevention is easier than cleanup. If you paint your nails regularly, consider these simple habits:
- Use a washable tray underneath
- Paint nails over towels
- Keep bottles away from tile edges
- Close bottles tightly between coats
- Work in well-lit spaces
Small habits create a huge difference. A towel beneath your nail station acts like a safety net, catching spills before they reach grout or textured flooring.
If you have children or pets, storing nail polish securely becomes even more important. Several homeowners online described major spills caused by toddlers or dropped bottles during storage.
Conclusion
Removing nail polish from a tile floor is usually far less catastrophic than it first appears. Most ceramic and porcelain tiles can handle nail polish cleanup successfully when you use the right solvents, gentle tools, and patient techniques. The real challenge is not the stain itself but avoiding damage during the cleaning process.
Understanding your tile type is the foundation of safe cleanup. Glazed ceramic and porcelain are generally durable enough for rubbing alcohol or controlled acetone use, while natural stone requires much gentler methods. Grout deserves extra caution because it absorbs pigment quickly and may need resealing afterward.
The safest cleaning philosophy is simple: start mild, escalate slowly, and never scrub aggressively out of frustration. Nail polish may look intimidating on tile, but with the right process, you can usually restore the floor completely without scratches, dull spots, or discoloration.
FAQs
1. Can acetone damage tile floors?
Acetone is generally safe for glazed ceramic and porcelain tiles when used carefully, but it may damage natural stone, decorative finishes, or grout sealers. Always test a hidden area first before full application.
2. What is the safest way to remove dried nail polish from grout?
Rubbing alcohol combined with a soft toothbrush is usually the safest method. For stubborn stains, hydrogen peroxide or baking soda paste may help lift pigments without excessive abrasion.
3. Can nail polish permanently stain tile?
Most glazed ceramic and porcelain tiles resist permanent staining because they are non-porous. Natural stone and grout are more vulnerable because they absorb pigments more easily.
4. Should I use metal scrapers on tile floors?
No. Metal scrapers and razor blades can scratch tile finishes permanently. Plastic scrapers or old credit cards are much safer alternatives.
5. Is rubbing alcohol better than nail polish remover?
For many tile surfaces, yes. Rubbing alcohol is gentler and safer for grout and finishes, while acetone-based removers work faster but carry a higher risk of damage.