

Let’s start with a simple truth: a junction box isn’t optional; it’s essential. If you’re connecting wires in your ceiling, you’re dealing with electricity that can spark, overheat, or fail unexpectedly. A junction box acts like a protective shield, containing those connections and preventing hazards like fires or electric shocks. According to modern electrical standards, all wire splices must be enclosed inside an approved junction box, ensuring safety and compliance with regulations .
Think of it like putting a fragile object in a protective case. Without that case, even a small bump could cause damage. Similarly, exposed wiring is vulnerable to heat, dust, and accidental contact. Junction boxes also make maintenance easier. If something goes wrong later, electricians can access the wiring without tearing apart your ceiling.
Another important reason is fire prevention. When wires are spliced, there’s always a risk of loose connections or arcing. A junction box contains these risks and prevents sparks from reaching flammable materials. This is why building codes worldwide emphasize their use; not just for safety, but for long-term reliability.
Common Applications in Ceiling Installations
You’ll typically find junction boxes in ceilings where electrical connections are hidden but still functional. Common examples include light fixtures, ceiling fans, and branching electrical circuits. Anytime wires split or connect above your head, a junction box is likely involved.
In many homes, the ceiling junction box doubles as a mounting point for fixtures. For instance, a ceiling light isn’t just hanging there randomly; it’s attached to a box that supports both the fixture and the wiring. For heavier loads like ceiling fans, specialized boxes are required because of vibration and weight.
Another common scenario is when extending wiring. Let’s say you’re adding a new light in another part of the room. The connection point in the ceiling will need a junction box to safely distribute power. This ensures that everything stays organized and protected. Without it, you’d be dealing with a tangled, unsafe mess hidden behind drywall; definitely not something you want.
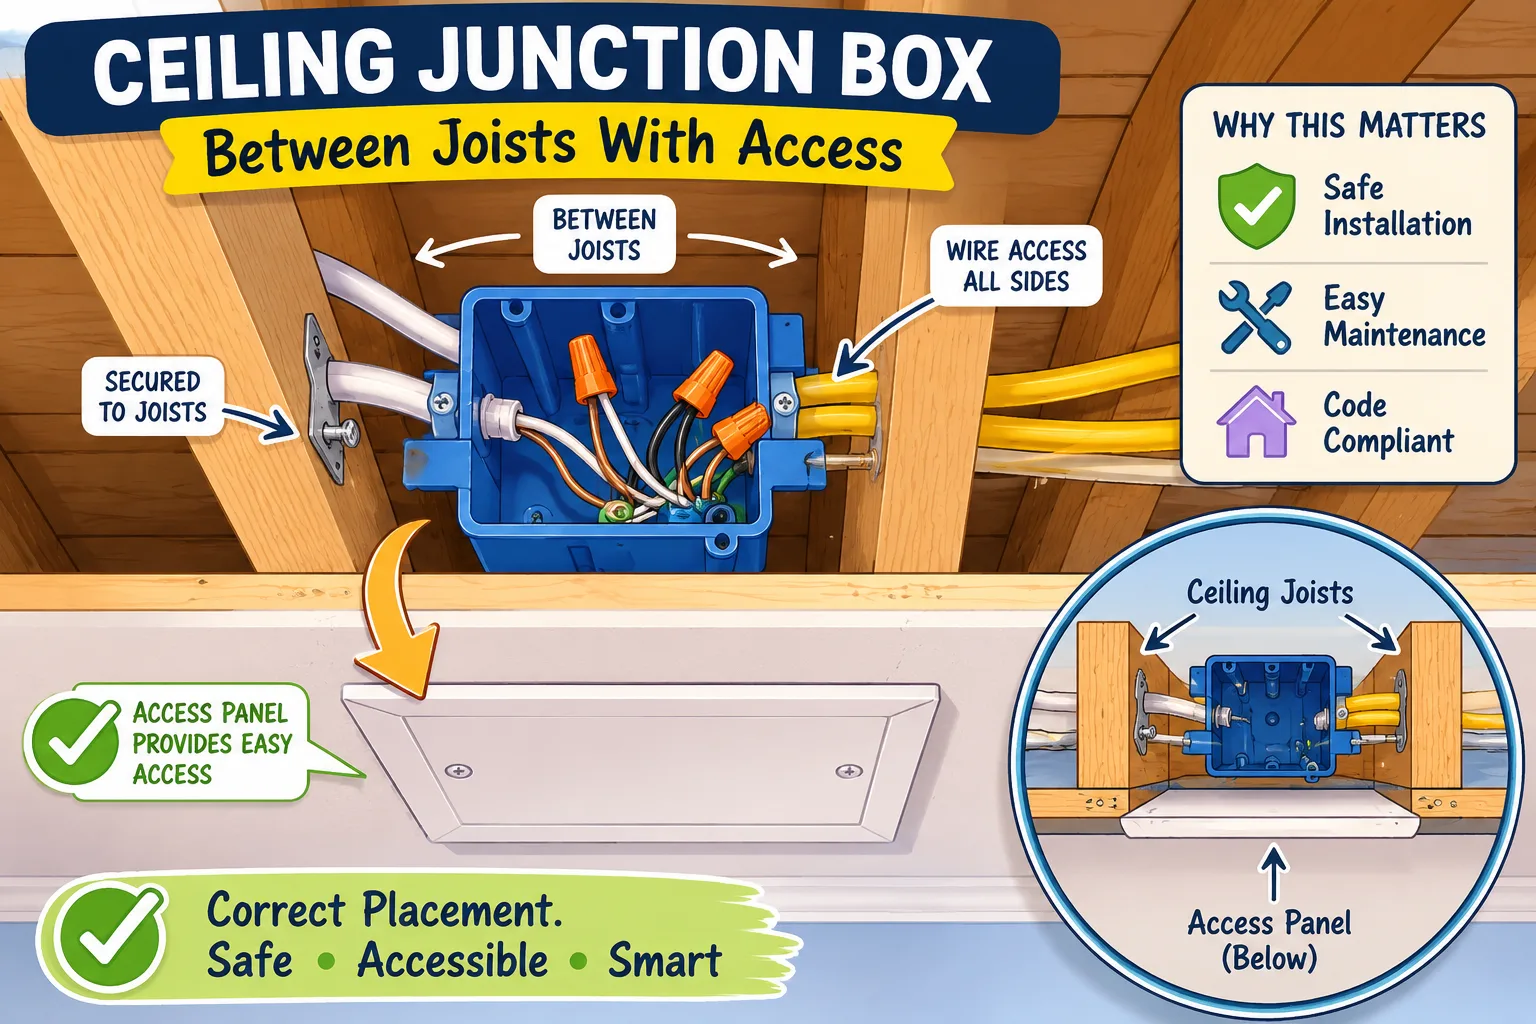
Identifying the Right Location for a Junction Box
Accessibility Requirements and Safety Standards
Here’s where many people get it wrong: you can’t just install a junction box anywhere and seal it away forever. Electrical codes require that junction boxes remain accessible at all times. That means no hiding them behind drywall or permanently sealing them in the ceiling .
Why does this matter? Imagine a problem occurs; maybe a loose wire or a short circuit. If the box is inaccessible, fixing it becomes a nightmare. You’d have to cut into the ceiling just to reach it. That’s exactly what safety standards are designed to prevent.
Accessible doesn’t mean visible all the time, though. For example, placing a junction box above a drop ceiling with removable tiles is perfectly acceptable. The key is that it can be reached without damaging the structure. This balance between safety and practicality is what defines proper placement.
Structural Considerations in Ceiling Placement
Beyond accessibility, you need to think about structural support. A junction box must be securely attached to a solid part of the ceiling, such as a joist or beam. This is especially critical if the box will support a light fixture or fan.
If you’ve ever seen a wobbly ceiling light, chances are the box wasn’t mounted properly. Electrical codes specify that boxes must be firmly secured to prevent movement or stress on the wiring . This stability ensures that connections remain tight over time.
Also, consider spacing and clearance. You don’t want to cram a box into a tight spot where wires are forced to bend sharply. Proper placement allows cables to enter the box smoothly and safely. Think of it like giving your wiring room to breathe; it reduces strain and improves longevity.
Selecting Proper Box Type and Materials
Metal vs Plastic Junction Boxes
Choosing the right material is like picking the right tool for a job; it makes everything easier and safer. Metal junction boxes are known for durability and are often used in commercial or heavy-duty applications. They provide excellent grounding and can withstand higher stress levels.
On the other hand, plastic (non-metallic) boxes are lightweight, resistant to corrosion, and easier to install. They’re commonly used in residential settings where conditions are less demanding. Both types must meet safety standards and be suitable for the environment they’re used in .
So, which one should you choose? If you’re working in a standard home ceiling with no special conditions, plastic boxes are usually sufficient. But if you’re dealing with heavy fixtures or metal conduit systems, a metal box might be the better option.
Choosing Boxes for Ceiling Fixtures and Fans
Not all junction boxes are created equal; especially when it comes to ceiling installations. If you’re installing a ceiling fan, you need a box specifically rated for that purpose. Regular boxes aren’t designed to handle the weight and vibration of a fan, which can lead to dangerous failures.
Electrical standards require that boxes used for ceiling-mounted fixtures be rated for their intended load. For example, fan-rated boxes are reinforced and designed to handle dynamic forces. Using the wrong type isn’t just risky; it’s a code violation.
Even for light fixtures, you should check weight limits. Some boxes are only rated for lightweight fixtures, while others can handle heavier loads. Paying attention to these details ensures your installation is both safe and compliant.
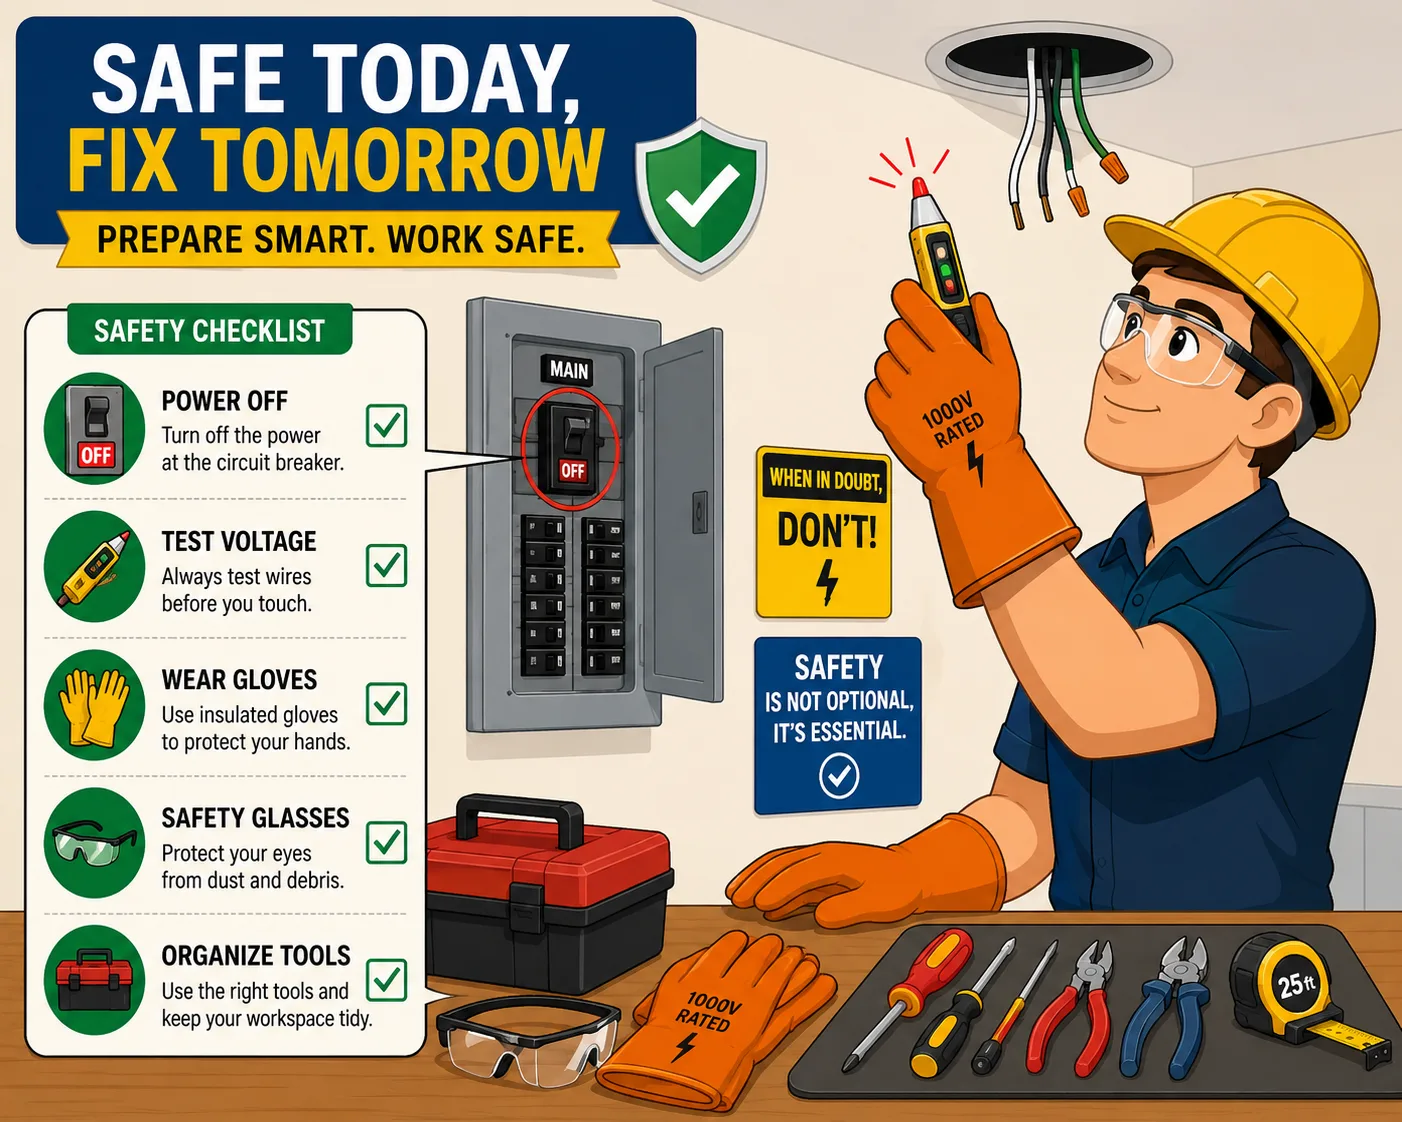
Safety Precautions Before Installation
Turning Off Power and Verifying Circuits
Before you even think about touching wires, turn off the power. It sounds obvious, but you’d be surprised how many accidents happen because someone skipped this step. Go to your circuit breaker and shut off the relevant circuit.
But don’t stop there; always verify that the power is off using a voltage tester. Electricity doesn’t forgive mistakes, and assuming a circuit is off can be dangerous. Testing ensures you’re working in a safe environment.
This step is your first line of defense. Think of it as locking the door before leaving your house; it’s basic, but absolutely necessary.
Personal Protective Equipment and Tools
Safety isn’t just about turning off power; it’s also about protecting yourself physically. Wear insulated gloves, safety glasses, and appropriate footwear. These simple precautions can prevent injuries from accidental contact or falling debris.
Using the right tools also makes a big difference. Insulated screwdrivers, wire strippers, and cable cutters are essential for safe and efficient work. Cheap or inappropriate tools can damage wires and increase risk.
Preparation sets the tone for the entire project. When you’re properly equipped, the installation becomes smoother, safer, and more professional.
Step-by-Step Installation Process
Cutting the Opening and Preparing the Ceiling
The first physical step is creating space for your junction box. This involves cutting an opening in the ceiling that matches the size of the box. Precision matters here; too large, and the box won’t fit securely; too small, and you’ll struggle to install it.
Use a template or measure carefully before cutting. This ensures a clean, professional result. Once the opening is ready, check for any obstructions like pipes or existing wiring.
Preparation at this stage prevents headaches later. It’s like laying a solid foundation before building a house; everything depends on it.
Mounting the Junction Box Securely
Next comes one of the most critical steps: securing the box. It must be firmly attached to a structural element like a joist or beam. This prevents movement and ensures long-term stability.
There are different mounting methods depending on your ceiling type. For example, you might use brackets, screws, or bar hangers. The goal is the same; a solid, immovable installation.
Remember, a loose box can lead to loose connections, and that’s a recipe for trouble. Take your time and do it right.
Running Electrical Cables Properly
Once the box is in place, you’ll run cables into it. This step requires careful handling to avoid damaging the insulation. Use proper clamps or connectors to secure the cables as they enter the box.
Electrical codes emphasize protecting cables from sharp edges and ensuring they’re properly supported . This reduces wear and tear over time.
Think of cable management like organizing wires behind your desk. When everything is neat and secure, it’s easier to maintain and less likely to fail.
Securing and Wiring Connections Correctly
Proper Wire Splicing Techniques
Inside the junction box, wires are connected using splicing techniques. This usually involves twisting wires together and securing them with wire connectors. The goal is a tight, reliable connection that won’t loosen over time.
Loose connections are one of the most common causes of electrical issues. They can lead to overheating, arcing, and even fires. Taking the time to make solid connections is crucial for safety.
Each splice should be neat and organized. Avoid overcrowding the box, as this can cause overheating and violate code requirements.
Grounding and Cable Management
Grounding is a critical part of any electrical installation. It provides a safe path for excess electricity, reducing the risk of shocks. Metal boxes must be properly grounded using screws or clips .
Cable management also plays a role in safety. Keep wires organized and avoid sharp bends. This not only looks professional but also reduces stress on the wires.
A well-organized junction box is like a well-organized toolbox; it makes everything easier and safer.
Testing and Compliance with Electrical Codes
Verifying Electrical Connections
After everything is installed, it’s time to test your work. Turn the power back on and check that everything functions correctly. Use a voltage tester or multimeter to verify connections.
Testing isn’t just about functionality; it’s about safety. You want to ensure there are no loose connections or unexpected issues.
If something doesn’t work, don’t ignore it. Troubleshoot immediately to prevent bigger problems later.
Meeting NEC and Local Code Requirements
Compliance with electrical codes is non-negotiable. These codes ensure installations are safe and reliable. Key requirements include proper box sizing, grounding, and accessibility .
Here’s a quick comparison of key compliance factors:
| Requirement | Description | Importance |
|---|---|---|
| Accessibility | Box must remain reachable | Ensures maintenance and safety |
| Grounding | Proper grounding required | Prevents electric shock |
| Box Fill | Adequate space for wires | Avoids overheating |
| Secure Mounting | Firm attachment to structure | Prevents movement and damage |
Following these guidelines not only keeps you safe but also ensures your installation passes inspection.

Common Mistakes to Avoid During Installation
One of the biggest mistakes people make is burying a junction box behind drywall. This might seem like a neat solution, but it violates electrical codes and creates serious safety risks. Another common error is using the wrong type of box for the application, especially when installing ceiling fans.
Overcrowding the box is another issue. When too many wires are crammed into a small space, it can lead to overheating and damage. Proper sizing is essential to avoid these problems.
Skipping grounding or failing to secure the box properly are also frequent mistakes. Each of these errors might seem small, but they can have significant consequences over time.
Tools and Materials Checklist
Before starting your project, make sure you have everything you need. This includes a junction box, screws, wire connectors, electrical cables, and basic tools like screwdrivers and wire strippers.
Having the right materials on hand saves time and prevents interruptions. It also ensures you can complete the installation correctly without cutting corners.
Preparation is key to success, and a well-stocked toolkit is your best ally.
Cost and Time Considerations
Installing a junction box in the ceiling is generally affordable, but costs can vary depending on materials and complexity. A basic junction box might cost just a few dollars, while specialized boxes for fans or heavy fixtures can be more expensive.
Time-wise, a simple installation can take an hour or two. However, more complex projects involving new wiring or structural modifications may take longer.
Investing time and money in a proper installation pays off in the long run. It ensures safety, reliability, and peace of mind.
Conclusion
Installing a junction box in the ceiling might seem like a straightforward task, but it requires careful planning, proper materials, and strict adherence to safety standards. From choosing the right location to ensuring compliance with electrical codes, every step plays a crucial role in the final result.
When done correctly, a junction box protects your wiring, prevents hazards, and ensures your electrical system runs smoothly for years. It’s one of those behind-the-scenes components that quietly does its job; but makes all the difference.
FAQs
1. Can I install a junction box without professional help?
Yes, but only if you have basic electrical knowledge and follow safety guidelines carefully. Otherwise, hiring a professional is recommended.
2. Is it legal to hide a junction box in the ceiling?
No, junction boxes must remain accessible and cannot be permanently concealed behind drywall.
3. What type of box should I use for a ceiling fan?
You must use a fan-rated junction box designed to handle weight and vibration.
4. How do I know if my junction box is overloaded?
Check the box fill capacity and ensure there’s enough space for all wires without crowding.
5. Why is grounding important in a junction box?
Grounding provides a safe path for electrical faults, reducing the risk of shocks and fires.